



Navigating Project Management
Subcontractor Portal Help Video
Watch the video below to learn more about the Subcontractor Portal.
Job Info
To view essential details about an individual Job, go to Job Info in the Job Menu. This feature is accessible on both Desktop and Mobile.
On Desktop, first select the Job from the Jobs Menu. Click the Information Icon within the Job name.

Find important Job Information page available to you, such as address, Project Managers and additional Job Notes provided by the builder.

Job Info | Mobile
To view the Job Info from the mobile app, first select the Job from the Jobs Menu.

Select the Job you'd like to view.

Click the More button, then open the Project Management tab.

Then, choose Job Details.
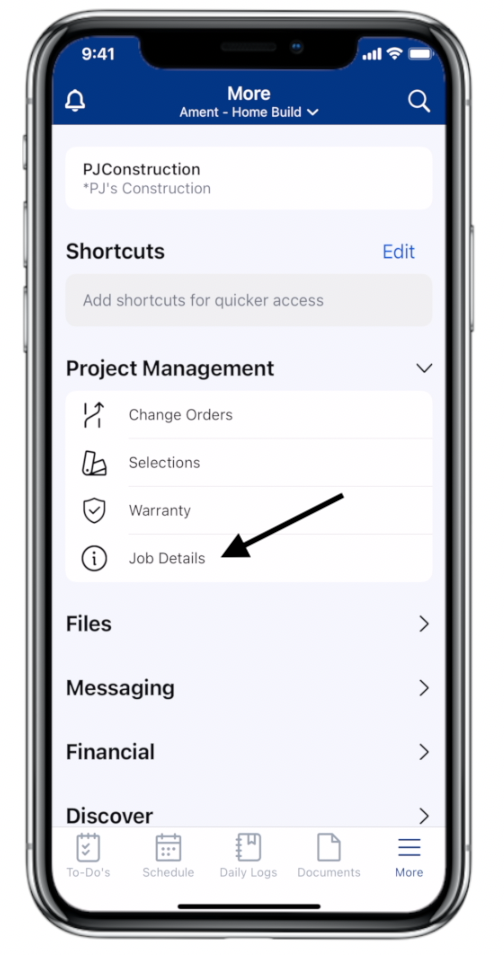
Access the same information as the desktop version and get quick directions to the job address using your phone’s default Maps app (Google Maps, Apple Maps, etc.).


Schedule
The Schedule serves as the primary job calendar, offering timelines and task assignments to keep you aligned with the building team. Use it to track upcoming deadlines and confirm your attendance once you've been scheduled for work, whether you're on Desktop or Mobile.
On Desktop, first select the Job from the Jobs Menu. Then, click Schedule from the Project Management dropdown.

Explore the Schedule through the Calendar view (shown below), List view, or Gantt view. View the Schedule by Month, Week, Day or Agenda, as needed.

Use Filters to refine the information and focus on what you need, such as items only Assigned to you and item Status.

Additionally, toggle between jobs or choose to view all jobs in the Schedule, allowing you to see your entire day at a glance.
If the schedule shows as Offline, the builder has yet to share the calendar to their trades.

To view items you've been assigned, you may follow the email notification, or click on the item within Buildertrend you're scheduled for.

If opted in, your builder may request you to confirm your scheduled arrival time. They’ll receive a notification once you’ve received and confirmed the request. Select Confirm or Decline to notify your builder.
Quickly send a note to your builder related to this Schedule Item by utilizing the Comments section of the item, shown above.
Type in the Comments field, and click Send. This Comment will now be present on this specific scheduled item for continued communication.
For time-sensitive inquiries, use an RFI (Request for Information) to ask or respond to questions with a specified deadline. Select Create RFI under Comments to initiate.

Schedule | Mobile
To view the Schedule from the mobile app, first select the Job from the Jobs Menu.
Click Schedule from the bottom menu bar.
Toggle between Month, Agenda and List views to find your preferred view.
Select Filters to adjust Assignment, Status and Dates.
Select the item to view more information, including Comments, RFI's and confirmation options, just like Desktop.
Daily Logs
Daily Logs are used to communicate job site progress, keeping everyone updated where needed. This feature is accessible on both Desktop and Mobile.
On Desktop, first select the Job from the Jobs Menu. Then, click Daily Logs from the Project Management dropdown.

Review existing Daily Logs, or click + Daily Log to create a new one.

In the updated Daily Log, you can easily add Notes and Attachments. Optional fields like Title and Tags are also available for added detail.
The Date will default to today’s date but can be adjusted to log past events. Weather details will auto-update based on the selected date and the job's zip code.

After saving, creation details like the date and time stamp, as well as the name of the user or subcontractor, will be displayed.

After saving, you can add To-Dos, Comments, or RFIs for streamlined communication. Related Items will remain linked, keeping all relevant updates easily accessible in one place.

Daily Logs | Mobile
To view Daily Logs from the mobile app, first select the Job from the Jobs Menu.
Click Daily Logs from the menu bar.

Find previously created Daily Logs, and create new logs by tapping the (+) button on the top right.
Add Notes, Attachments and set Weather Conditions visibility.

Attachments may be added via camera roll, or in real-time as a photo or video.
Once you've added a photo to the Daily Log, you may Annotate to draw attention to specific areas. Simply select the paintbrush icon and use options like highlight, circle, or others as needed.
Click Attach to add the Photo to the Log.

Once you have all information added properly, click the Save.
To edit, revise, or add onto, click the Log you created and then click the Edit button. You can add in more attachments, or update the Notes for the Log.

Towards the bottom of the Daily Log, add a Comment or related To-Do.
Select Filters to search for specific Keywords, creation Dates or more.
To-Do's
To-Do's are an excellent tool for managing and organizing your upcoming tasks. Builders can assign To-Do's directly to you, or you can create them for yourself to ensure effective daily management. This feature is accessible on both Desktop and Mobile.
On Desktop, first select the Job from the Jobs Menu. Then, click To-Do's from the Project Management dropdown.

You will be able to see all To-Do's that have been assigned to yourself from your Builder, along with the Priority and any Files attached.
Review existing To-Do's, Filter to find specific information, or click New To-Do to add new.
Click the To-Do Title to view all important information.

Review important information such as Notes, Priority, Due Dates, Attachments, etc.
Toggle between the To-Do and Checklist items within the To-Do.

Use Checklist Items to organize tasks within the larger To-Do.
Mark the Checklist Item complete by checking the circle beside the item.
Once all Checklist Items have been completed, click To-Do is Complete and then click Save. This will ensure a notification can be sent to the Builder once the To-Do has been completed.

To create a To-Do for yourself, click the New To-Do button. Buildertrend will automatically assign the task to you, as well as provide visibility options to either share it with your builder or keep it private.
Once created, click Save.
To-Dos | Mobile
To view To-Do's from the mobile app, first select the Job from the Jobs Menu.
Click To-Do's from the menu bar.
Find previously created To-Do's and create new, by tapping the (+) button on the top right.
Add important information such as Title, Notes, Deadlines. As a best practice, add in a Deadline to ensure the To-Do falls in line with the production schedule of your builder.
Additionally, add Reminders, Checklist Items and Priority.
Select Filters to search for specific Keywords, creation Dates or more.
Change Orders
Change Orders act as a way to document post-contract changes requested by the customer. Subcontractors will have the ability to view approved change orders from their Sub Portal for consistent communication regarding additional work. This feature is accessible on both Desktop and Mobile.
On Desktop, first select the Job from the Jobs Menu. Then, click Change Orders from the Project Management dropdown.

Change Orders will have to be approved first to view from the Sub Portal.
Click the Change Order title to view all important information.

Review overall scope with Description, Notes, Attachments and RFIs.
You may attach Post-Approval documents or photos, Comment to the Builder, as well as submit an RFI for more information.

Change Order | Mobile
To view Change Orders from the mobile app, first select the Job from the Jobs Menu.
Then, click More from the menu bar and find Change Orders from within the Project Management tab.
Click on the Change Order to view all details.
Review overall scope with Description, Notes, and Attachments.
View and add Comments to the Builder, as well as submit an RFI for more information.
To add information to the Change Order, such as an Attachment, select the Edit button.
Click Add Attachment to include any Photos or Documents for your builder to review.
Once updated, click Save.
Selections
Selections are tools that allow both builders and customers to choose items for their projects, such as tile, paint colors, appliance packages, and more. Subcontractors and vendors can view the approved selections they are involved with, ensuring consistent communication regarding any additional work needed. This feature is accessible on both Desktop and Mobile.
On Desktop, first select the Job from the Jobs Menu. Then, click Selections from the Project Management dropdown.
Review Upcoming Selections, Completed Selections, and Outstanding Pricing Requests that need your attention.
Upcoming Selections are marked as Pending status. This indicates that the builder has provided them to the customer, but approval has not yet been given.

Click on the Title of the Selection to view important information. Completed Selections represent a confirmed approval by either the Builder or the Customer.
The Selected Choice will show the Customer or Builder approval. Add a Comment to pass along important communication to you builder.
Finally, Outstanding Pricing Requests reflect Choices that require your participation to complete the price quote.
To respond to an Outstanding Price Request, click on Submit Price(s).
Next, click on the Choice.
You can provide a Product Link of the specific Choice.
Scroll down to update the Price Details and add any Price Notes for the builder. Once completed, click Save to notify the builder that the price has been submitted.
In some cases, builders may allow vendors to provide Choices for customer approval.
To do so, click on the Pending Selection and click Add Choices or Create New Choice.

From here, provide a Choice Title, a photo by clicking Add Attachments, and a Product Link to provide more detail.

Scroll down to update the Price Details, Price Notes, and any Product Descriptions for the Builder and Customer.
Once completed, click Save to notify the builder a Choice has been submitted.

Selections | Mobile
To view Selections from the mobile app, first select the Job from the Jobs Menu.
Then, click More from the menu bar and find Selections from within the Project Management tab.

Here you will have access to all approved Selections, and/or any Choice you are being requested to provide a price for.
Choices that have been approved will show with a green check mark status.

Choices that need to be approved will show as a yellow Pending status.
Selections that have not yet been approved will appear with a grayed out status.
To complete a price request, choose the Selection.
Next, click the Choice.
Click on the Builder Cost tab to update pricing for that Choice.
Once updated, click Save to notify the builder.
If you have been given permission to add a choice, select Add Choice.
Warranty
Warranty facilitates the workflow for customers who have filed a Claim and are seeking resolution for their project. Builders may include you in relevant Claims related to your work and can request a service appointment to address the Claim issue. This feature is accessible on both Desktop and Mobile.
On Desktop, first select the Job from the Jobs Menu. Then, click Warranty from the Project Management dropdown.

View Title, Priority, and Scheduling Information for each Claim.
Next to the Scheduling Information, you will see the hammer and house icons. The hammer icon represents the trade, while the house icon signifies the client, both of whom need to accept the scheduled service appointment. During this stage, the warranty claim remains in Pending status.
To accept, click on the Title of the Warranty Claim.

Scroll down on the Warranty Claim to view the Problem Description and Accept or Reschedule the Appointment.
To visit a Warranty Claim issue, set an appointment, then click Save & Submit to send suggested appointment.
Warranty | Mobile App
To view Warranty from the mobile app, first select the Job from the Jobs Menu.
Then, click More from the menu bar and find Warranty from within the Project Management tab.
From here, you can view all Upcoming, Open and Complete Warranty Claims that have been assigned.
Select the Claim to open details.
Important information such as Claim #, Description, Job Address and more can be found here.
Set an Appointment and add Instructions or Notes related to the Claim, visible to the builder and customer.
Once updated, click Save and Submit.
Add related Comments and RFIs for more communication needed to the builder.
Interested in Learning More? 📚
Visit the Buildertrend Learning Academy to explore additional learning opportunities — from live group trainings and certifications to on-demand courses and more.
For questions or additional support, contact our Customer Support team via Live Chat, email support@buildertrend.com, or call 1-888-415-7149 — we’re always happy to help.
Still have questions or need our help finding a resource?
Contact our Customer Success team.
Mon - Fri
8:00am - 5:00pm
USA (CST-6)